Friday, July 31, 2009

Blasting Luggage Compartment

I didn't have a ton of work to do at the office today so I took off early and blasted the ghia's luggage area and the bottom side of the hood (I stopped there because the blaster was empty and my wife was ready to go out and eat dinner.) I am just about wrapped up on the rust repairs up front. I noticed where the inner fender seals had been there were some issues, so it seemed like as good a time as any to clean things up. While blasting I hit the areas around the seals good and found a few rust holes there, so it was a good exercise to make sure I am 100% on the metal work.

It took about 3 hours and I went through 3 - 80# sacks of Black Diamond coal slag. This media works really well for this type of thing. I just wish my compressor could keep up a bit better. I have a 60gal 5hp black max and I usually stop about every 15-20 minutes to let it catch up and cool off for a few minutes.

Before. The dark parts aren't dirt, they are rust.
Blasted pretty clean. If I were scoring I'd give it a B+
What a freaking mess!!! That's 250# of coal slag. You can see the hood off to the side.


Thursday, July 30, 2009

Getting ready for some blasting

It looks like we are going to have some cool weather this weekend and since I am about 95% finished with the luggage compartment/front end of the car, it's time to media blast the area down to bare metal and seal it with epoxy.

I would prefer to do the blasting with the body off, but since my normal crew of car movers is out of town for an ironman race this weekend, it looks like it will have to be done with the body on.

I lifted the body up off the front beam with the engine hoist and put a couple sheets of visqueen over the running gear. Hopefully that will protect the paint and mechanicals. I also hung plastic up on the windshield and below the dash. I know it won't catch 100% of the slag, but it will catch a lion's share of the mess. Hopefully my pressure blaster will cooperate and give me a couple good hours of blasting.

Car sheeted up

Monday, July 27, 2009

Inner fender front panel

I spent about an hour tonight fabbing up the lower front section of the LF inner fender panel. I made a paper template first since I know I'll have to make the same part for the RF inner fender. I drew out the paper template without the 90 degree edges and made it fit really well inside the existing part. Then I measured the 90 edges and lips and made notes to add that length to the outsides of the panel. The thickness of the edges varied from .6" to .4" and the rearmost section had a .4" full return so I made that section 1" larger than the template. There is a section with a joggle, so I clamped the blank down to a 3/16" thick piece of steel and beat the joggle in with a square sided hammer.

I also ordered the lower apron from Mike at House of Ghia www.house-of-ghia.com today. He said he would ship it today, so hopefully that will arrive before the weekend so I can start messing about with it as well.

template and a flat blank
part taking shape (right after I embossed the joggle)

part ready for welding and fitting up. I may cut it in half to make it easier to fit up.


Sunday, July 26, 2009

Driver's side front bumper mount

I had about an hour to work today, so I decided to remove the LF bumper mount. Both sides are equally crappy and I have to replace the apron, so I figured I'd remove both sides, then fix the apron. OR... I may remove the apron, then weld in the bumper mounts first. I'll have to see which makes more sense. In the end, not too many folks will ever see this area, so maybe I am overthinking it a bit.

I made a patch for the tire bubble, but I found out the replacement part from all the ghia parts folks is 36" wide. Looking at how the rot extends far beyond the bubble, I will need the whole patch. I will fab up the rear section that sits behind the spare tire and I will also fab up the end pieces of the inner fender (ie. the piece I removed today). I plan on fabbing the bumper mount as well. I've seen the repops and they are so-so. I can easily make one just as nice.

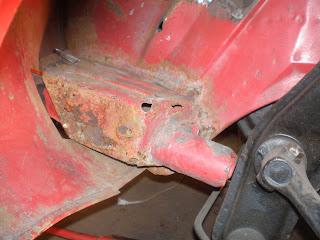
looking from the wheel opening at the bumper bracket mount
Looking at the mount from inside the trunk area (see the additional rot I was talking about?)

Bumper mount cut out. The rot is revealed!
The extracted bumper mount.

Wednesday, July 22, 2009

More work on DS inner fender

I am almost finished patching up the driver's side inner fender. The rust is surrounding the area where the mud plate seal sits. It has been a bear of a patch (please don't judge my welding skills here.) I can barely fit my head inside the wheel opening with my welding hood on and I've had a helluva time getting my hands, arms and the torch in there as well. To make matters even more, fun, I have a 1000 watt halogen light that sits on my lap so I can see what I am doing. About every 30 seconds I have to move it so my legs don't catch fire. The grinding has been just as much fun. I have a bit more cleanup to do, but since the inner fender will get rhino lined or something similar, I am not metal working it to 100%.

The next section I'll be addressing are the front bumper mounts. Looks like I am going to have to build them from scratch... They are REALLY bad.
First patch in, but there is a hole to the upper right of the patch

Repair area removed

Patch tacked in after about 3 hours of messing around

Patch ground down


Sunday, July 12, 2009

Tulip chairs and TDF take over ghia project

I have made just a little progress in the last week. I have been working on the same patch on the inner fender just behind the dash for quite awhile now. I keep hitting more rot and welding up growing holes. I think I have put about 5lbs of welding wire into this one patch... I am an avid cyclist and this is tour de france month. I have spent a lot of my "ghia time" watching guys in tight pants ride their bikes. They are off tomorrow, so I'll probably make some progress.

In the mean time, I had a couple old tulip chairs blasted and powder coated ($55 each). I thought they would look like doylies (spelling?) after the blasting, but they came out really nice. They belonged to my wife's great grandfather, so it was totally worth it to have them looking new again. I installed all new stainless hardware, so they should look like this 60 years from now.
before
after