I continued to strip paint and I hate to say it, but I have quite a bit more to do. I sanded off the rest of the paint on the passenger door skin, hit the rear cowl, and finished off the left rear quarter. I still have a bit to remove on the right rear quarter, a big patch on the driver's door, the windshield frame, engine bay, engine seal channel, door tops, dash, under dash and some spots on the nose. I figure a week's worth of nights or a long weekend of grinding and I'll have the whole car stripped. Every time I turn around it seems like I find another chunk of hidden paint!
I am trying to avoid stripping the inner fenders, but I may wind up doing them anyway. Right now I am planning to just scuff, coat with epoxy and then raptor liner them.
I'll be at the race track this weekend, so I won't make any progress on the body, but I am planning to take a bunch of chrome parts with me so I can buff them up. I'll post pics.
Wednesday, September 29, 2010
Monday, September 27, 2010
More Paint Stripping
I'm stalling a bit right now. I need a new rear apron because I crushed mine a couple weeks ago. I'm trying to source an original one, vs buying a repop. While I'm hunting that down, there are a few loose ends I am trying to tie up before I get all the welding completed. One of those loose ends is stripping off the remaining paint. On this project I've used a sandblaster, chemicals, and a DA with 24, 50 and 80 grit papers. I can officially say, no matter what you use, removing paint from a car is a long, difficult process.
The chemical strippers seem like they would be a dream, but the truth is, this car has 4-5 layers of paint on it. Every layer you strip off requires scraping with a putty knife before the paint starts to harden up. After 5 layers of chemicals, I realize it takes just as long as when I use the DA...
That said, I used a combo of chemicals and DA over the weekend to get the skin on right side of the car almost completely stripped. Tonight I used a DA with 50 grit to do the same areas on the driver's side. Both side took me over 3 hours each. If I had a better compressor, I could probably cut the time by 1/2. I run my DA at 75 psi because any more than that I have to stop every ten minutes because it dips to about 40 psi. If I run lower than 75, I might as well sand it by hand. I've also tried my 2" and 3" die grinders and variouse other abrasives... All take about the same amount of time.
I still have the engine bay and a few small spots around the car to strip, but I am getting very close to complete. Hopefully I'll find some time this week to sand blast the lower inner fender areas and get them in POR 15 so I can well on the fender skins. I also spent time tonight scrapping off 35 years of crud from the right front wheel well.
In the past couple weeks I have also focused my overall approach for the paint. I am going to use U-Pol tintable Raptor bed liner for all four wheel wells and the area under the engine bay and luggage area as well as the front "fire wall" area. The actually front trunk area may or may not get nice paint vs bed liner. The nice thing about the Raptor is you can add urethane paint to it and color match your car.
I believe I may have also found a color for the car. I wanted to do Lizard Green, which is an old 50s-60s VW color, but I may have found a better color. The new beetles have a color called Gecko Green Metalic. I saw one drive by the other day and realized that might be a nice color for my Ghia. I suspect it's also easier to get ahold of someone who can mix it properly. I've seen some bad mixes of old colors before. Does Gecko=Lizard??? I'll have to get a test panel done and find out.
If I can pin down the exterior color, I will then decide what flavor of Haartz canvas to go with. I will be ordering swatches in the next few weeks to help make the decision.
 right side after a couple layers have been chemically peeled
 right side after chemicals and 80 grit on a DA

Left side mid-strip. It was too dark for pics when I wrapped up tonight.
The chemical strippers seem like they would be a dream, but the truth is, this car has 4-5 layers of paint on it. Every layer you strip off requires scraping with a putty knife before the paint starts to harden up. After 5 layers of chemicals, I realize it takes just as long as when I use the DA...
That said, I used a combo of chemicals and DA over the weekend to get the skin on right side of the car almost completely stripped. Tonight I used a DA with 50 grit to do the same areas on the driver's side. Both side took me over 3 hours each. If I had a better compressor, I could probably cut the time by 1/2. I run my DA at 75 psi because any more than that I have to stop every ten minutes because it dips to about 40 psi. If I run lower than 75, I might as well sand it by hand. I've also tried my 2" and 3" die grinders and variouse other abrasives... All take about the same amount of time.
I still have the engine bay and a few small spots around the car to strip, but I am getting very close to complete. Hopefully I'll find some time this week to sand blast the lower inner fender areas and get them in POR 15 so I can well on the fender skins. I also spent time tonight scrapping off 35 years of crud from the right front wheel well.
In the past couple weeks I have also focused my overall approach for the paint. I am going to use U-Pol tintable Raptor bed liner for all four wheel wells and the area under the engine bay and luggage area as well as the front "fire wall" area. The actually front trunk area may or may not get nice paint vs bed liner. The nice thing about the Raptor is you can add urethane paint to it and color match your car.
I believe I may have also found a color for the car. I wanted to do Lizard Green, which is an old 50s-60s VW color, but I may have found a better color. The new beetles have a color called Gecko Green Metalic. I saw one drive by the other day and realized that might be a nice color for my Ghia. I suspect it's also easier to get ahold of someone who can mix it properly. I've seen some bad mixes of old colors before. Does Gecko=Lizard??? I'll have to get a test panel done and find out.
If I can pin down the exterior color, I will then decide what flavor of Haartz canvas to go with. I will be ordering swatches in the next few weeks to help make the decision.
 right side after a couple layers have been chemically peeled
 right side after chemicals and 80 grit on a DA
Left side mid-strip. It was too dark for pics when I wrapped up tonight.
Wednesday, September 15, 2010
Progress from Brian's and Beyond
I can tell the weather has finally broken. I have the itch to work on the car constantly now! I promised some pics of the progress we made last week and they are at the bottom of this post. I can't tell you how much the use of Brian's lift helped in pushing the project closer to completion. I am claiming that last week embodied a year's worth of work. We raised and lowered the body no fewer than 20 times. When I do that at home it takes a few helpers to remove it, then a few helpers to put it back onto the chassis. Usually there is about 3-4 days between lifting and replacing. We could do it in 30 seconds at Brian's... I CAN'T THANK BRIAN ENOUGH!!!
Tonight I worked on painting up the headlight buckets I blasted last night. Out of 4 buckets, I came up with 2 good sets of parts! I had a few issues removing a couple of the screws, but all is well. The blasting yielded 95% clean metal (forgot to take photo) and I coated with POR15. I will weld the jack mounts on tomorrow night over at Brian's.
I bought rubber body bushings for the trailing arm/shock tower, front axle mount and area under the luggage compartment where it mounts to the frame. The new bushings are incredibly stiff and the old ones are very spongy. This is causing the door gaps to close at the rear of the door and it's causing the lower rear corner of the door to dip down. I am planning to put the old bushings in tomorrow night while I have access to the lift to see if that solves the problem. I have a feeling it will. If it works, I can either machine down the new bushings or just use the old ones. I bet the coupes have enough rigidity that it doesn't matter a whole lot. The verts on the other hand are very sensitive!
I forgot to take pics of the dog leg assembly, but it's in the tail end of this vid: http://www.youtube.com/watch?v=hAIn4VHMTtA

Right side dog leg welded in. Also new bottom of fender well support, A-Pillar support and cap on the end of the rocker skin.

Left side crossmember support removed. Also removed a chunk of the wheel well above the trailing arm.

crossmember support patch welded and bottom of wheel well patched up
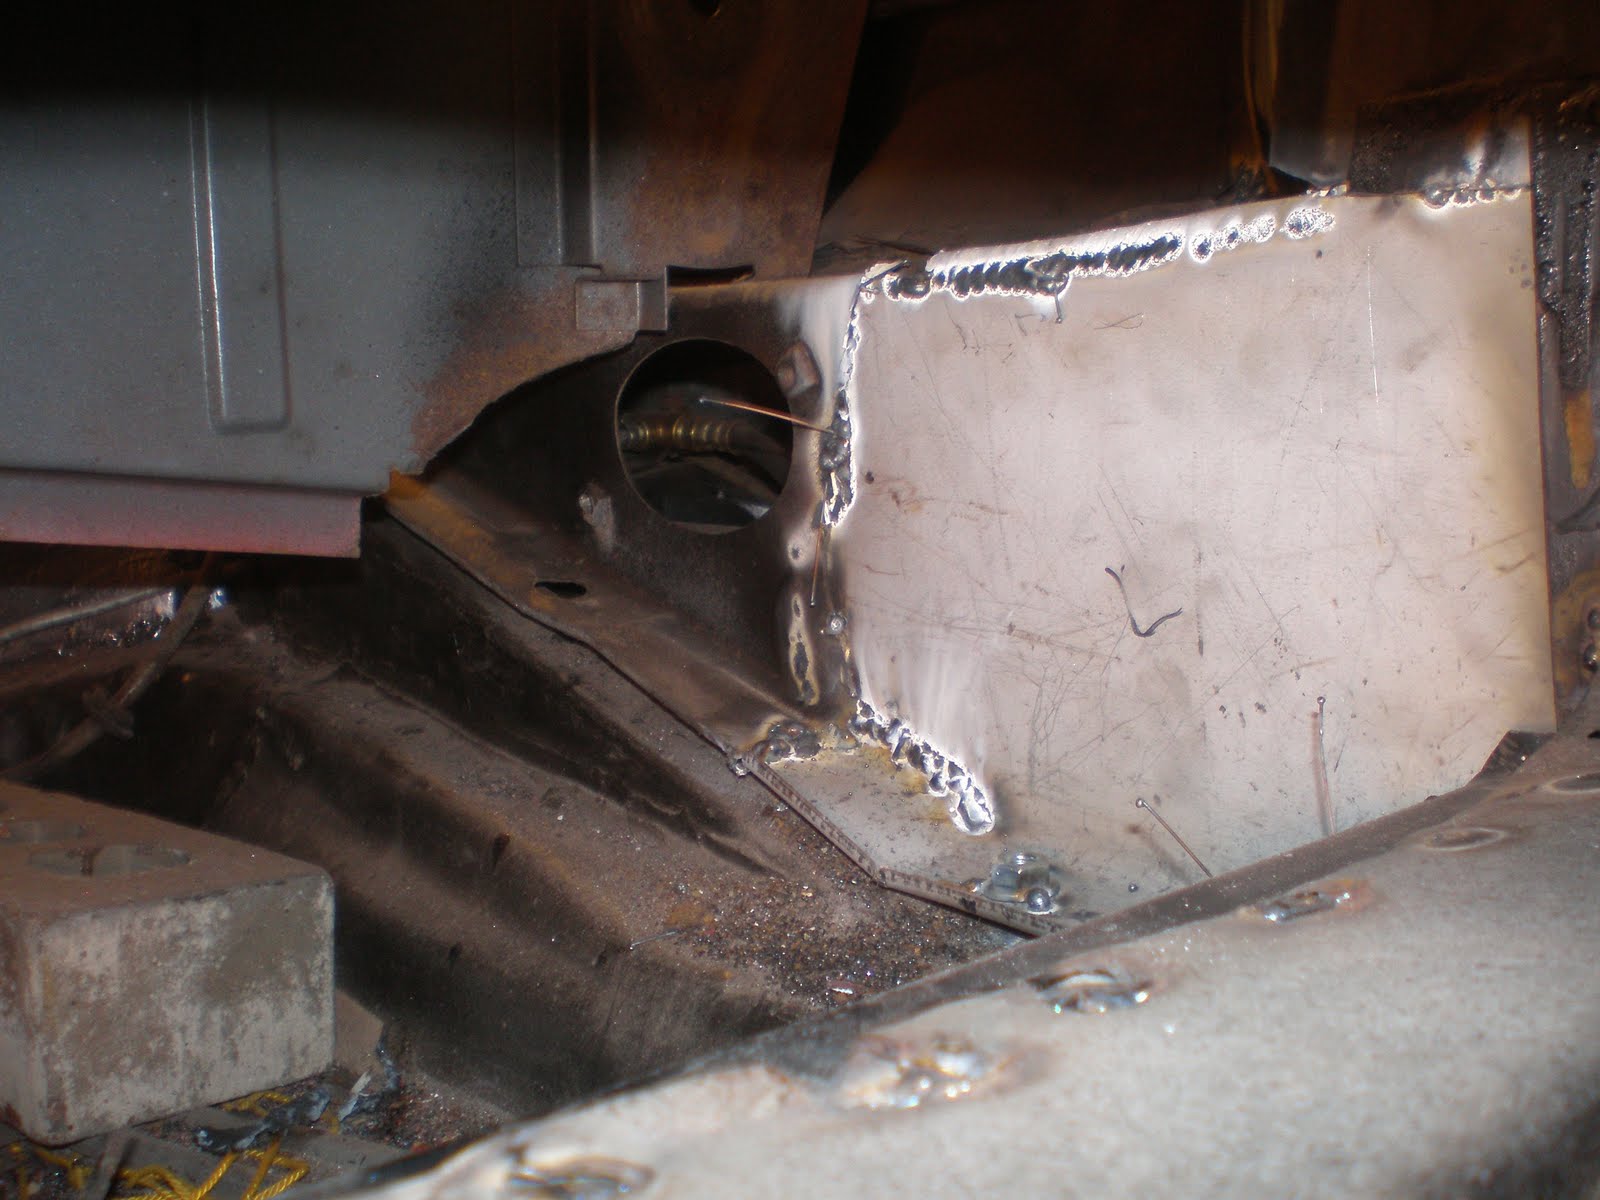 view of crossmember looking in from above rocker panel looking toward rear of the car. You can see the flange nut welded to the patch.
Grandpa Cecil fitting up the patch panel for the right side crossmember support Right side crossmember support panel welded in
 Right side wheel well patches welded in
 Jack mounts. Left is the condition they were in when we took them off the car. The right one has been sand blasted.
Headlight buckets and jack mounts after a coating of POR 15

Headlight buckets with POR 15 applied.
Tuesday, September 14, 2010
Work week complete but car not coming home
I am officially back to the office after a week's worth of tearing through the KG project. We really got a ton accomplished:
Filled in holes in wheel well to luggage compartment
Welded in plates on shock mount
Fabbed and welded in RT dogleg
Fabbed and welded A-Pillar support
Fabbed and installed tranny linkage cover plate (was missing)
Drilled pan holes
Bolted down body
Fabbed and welded in crossmember to pan supports
Welded engine bay support pieces
Stripped seatbelt nuts off old pan, cleaned and welded onto new pan
Stripped jack mounts off old pan (ready to be blasted and welded on
The car is still at the shop, so hopefully I can knock out a few smaller projects this week. On the list:
Blast headlight buckets
Blast LT heat exchanger
Finish "tubbing" the wheel wells to fit the 60's engine bay
Grind all the unfinished welds
Drill holes for crossmember fastener
Blast and weld in seat tracks
Pictures to come.
Thursday, September 9, 2010
Ghia moved to a bigger shop for a week
This week has been another to mark on the calendar for progress on the Ghia. My friend Brian offered the use of his shop to me. He has a large garage with high ceilings and a car lift. The shop also comes with Brian's expert advice and on more than one occasion, the use of his highly skilled hands.
I towed the car over to his house on Thursday last week and we set the car up on the lift. With family in town and a few birthdays to celebrate, the car had to wait until Monday evening before I started to work on it. I had a week's worth of vacation I needed to use or loose, so I decided this week would be the "haul ass" on the Karmann Ghia week.
Before heading over to Brian's to get cracking, I wrote out a list of the jobs and the priority of those jobs, knowing, that I need to get everything done on the lift that requires lifting... At home I have a cherry picker, but that's not anywhere near as handy as a lift.
Priority number 1: get the rockers fully welded and complete... Sounds simple, but I've spent 3 days working on bracing up the doors (see pic for the "adjust-a-brace"), welding all the seams, adjusted the warped skins (from the repop factory, not from welding), filling gaps and grinding down the welds. At the end of the day today, the door gaps held when we removed the adjuster clamps on the door braces. I think that means we are done with the rockers. Now they just need to have the welds ground down for finishing.
Priority number 2: Grind hard to reach places that are easier to get to while standing. My wife's grandpa came and helped on Wednesday. He got in and ground down the back sides of the headlight skins, and the bumper bracket mounting points. I know he did more than that, but that's what I saw.
Priority number 3: weld up the holes in the wheel wells. This is going to happen tomorrow. I think we can knock out both sides in one day. If not, we will hit it over the weekend.
 car on the tow bar in Brian's driveway
 car situated on the lift
 rocker panel after the bow was taken out
 door brace with striker side adjustment (very handy for setting gaps)
 grandpa Cecil working the grinder
 Headlight bucket welded in
Subscribe to:
Posts (Atom)
