Saturday, November 21, 2009

Filling in passenger side air grill

I don't have great pics today. I decided to do a quick video of how I create patches for the car. I hope folks enjoy the video. I have one more major patch to put in the front of the car, then I'll flip the car end for end and continue the work on the rear. If it was still nice outside, I'd just park my truck outside and keep both ends of the car exposed... Too bad I'm a wuss and want to get into a nice warm truck on mornings when it's only 30 degrees outside.


Air vent before the patch
First piece of the patch tacked up

Sunday, November 8, 2009

Welding in the quarter apron

I spent about 3 hours refitting and welding in the panel Cecil and I made on Thursday. I had left a bit of the rain channel so the quarter panel wouldn't move before I welded in my patch... Well after a ton of fitting with the decklid and scratching my head, I figured out that the quarter might have been welded in wrong by the PO's body butcher. With that in mind, I cut the channel and freed the quarter up to move around a bit. I was able to take out some of the pie shape in the top of the gap and also I leveled up the quarter and decklid. After that was done, I welded in the panel and it looks like I haven't got a perfect gap, but it's about 1/2 way there... I'll either lead it in or hit it with the body filler. I doubt I'll cut any more on this panel, it's already been through hell and back.

Pie shaped gap before cutting the rain channel
Panel after another hour of fitting
Panel tacked up
Panel welded in. I left the last inch or so loose so I can shape the corner to fit later on when I fab the rain channel.

Luggage compartment/Wheel well repair

I had a change of plans yesterday. No sandblasting. As I was looking at the patch Cecil and I made Friday night, and contemplating welding it in, I noticed how easy it would be to fix the hole in the luggage compartment with the access from above. I set about making a patch and cutting out the bad spots in the wheel well and the luggage floor. After about an hour and a half I had a good fitting patch and I was ready to weld. About 1/2 an hour of welding and I am ready to grind everything down...

I still have some patches to weld in from the other side, but I will do that at a later date.

With the welding done, I decided to coat the other exposed areas of the wheel well and inner structure with POR-15.

After the painting was done, I called in my wife's uncle for some help installing the decklid so I could check out the gaps before committing to welding in my patch. It's been about 10 years since I've had the decklid on. The top gap was good, but both sides have a pie shaped gap that is wide at the top and looks good where the hood turns from horizontal to vertical. I'm not sure how to deal with that. I'll have to figure that out later.
Holes in the luggage
Patch tacked in
I POR'd all the reachable metal under the patch I cut out.
Decklid back on the car

Friday, November 6, 2009

Driver's side quarter panel top apron repair

My wife's grandpa Cecil came over to help again on the ghia. Man, it's nice having another set of hands and another brain to bounce ideas off of. Unfortunately, if you double the number of males in a garage working on a car, it usually equates twice the amount of past gas!!! :D

The PO's body butcher hacked 3 panels together to form the area where the rear quarter panel meets the rear apron behind the convertible top. He beat the crap out of the pieces to get them to fit together rather than trimming and butt welding... He definitely subscribed to the theory that body filler can make up for lack of metal working skill. There was a section of the panel where I removed more than 1/2" of filler.

After grinding back to decently smooth metal, I marked out our replacement area, then we set about making a paper template, then a metal panel. We worked the basic curves in by rolling the panel over a 12" long x 4" diameter metal pipe on my work bench. We got about 80% of the shape, and then found we needed to stretch the center of the panel a bit to get the edges to sit flat on the car. About 10 minutes of work on the english wheel and we were really close. We added a bit of twist, then did a very small amount of edge shrinking with my bolt shrinker (see previous post.) After the panel was shaped we added the 90 degree bend where the deck lid opening is. We did it by cutting the curve out of some plywood. Since the panel has curve there, we taped a paint stick to the center of the panel before we clamped it to the curve jig. A few minutes of tapping and it was time to mark the car for the cut.

I had to tape off the area for the cut because I had 4 sets of marks. This actually made the lines easier to see, so I might do that more in the future. About 10-15 minutes of cutting and fitting and our panel fit with about 1/100" gap all around... PERFECT!

Since the panel is removed, I'll be painting the wheel well from the top and also repairing a few welds on the firewall where the factory spots have been seperated. After that, I'll weld in the new patch sometime this weekend.

Panel after the body-chump beat it to death.
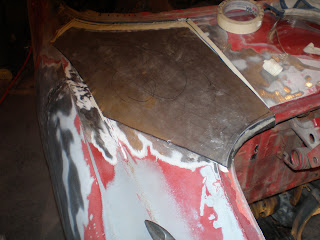
New, smooth, well fit panel ready for install.

Tuesday, November 3, 2009

Cleanup on engine bay continues

No photos today... Just spent about an hour cleaning up various pieces of sheet metal tacked to one another. I decided to grind off the metal rather than drilling out the welds. Sometimes it's harder to weld up the holes left by drilling than it is to grind down the metal and old welds. I have about one more solid hour of cleanup to do where the bay sheet metal meets the wheel wells. If everything goes well this week, I should be able to do some blasting/striping this weekend (assuming I can get the body off the frame again.)

Monday, November 2, 2009

Engine bay cleanup continues

I didn't have a ton of time to work tonight, but I did get something accomplished. I removed the valiance under the firewall. I also found a bit of damage to the underlying structure that will have to be repaired before I can put the new sheet metal in.

I am kicking around the idea of sand blasting the engine area and the area under the rear seat while I have the valiance out. I think it would be easier to access. I'll have to make a few phone calls to get my friends over here to lift the car back onto the dolly so I am not sandblasting the frame.
Engine bay with valiance and horizontal sheet metal 95% removed

Engine bay cleanup

I have decided to leave the front end and work on the rear of the car for awhile. The engine bay sheet metal is my first target. I have removed major chunks of the old metal and I'm working on grinding down the little fragments that are left. I have a donor set of tins from a 66. While the engine hole is the same size as a 74, the look is a bit more clean. I personally think it's a smoother look. The battery section of this tin is warped, so I either need to heat shrink it a bit or replace a section. I'll decided that soon. One other note, the wheel wells changed a bit from 66 to 74 (I suspect because of the shift from swing axle to IRS???) So the dimensions of the firewall are a bit different. I have the lower sections of the 66's wheel wells, so I may just graft them onto the 74 and then make transition panels... We'll see.

While ripping out my tins, I found more crap sheet metal work. It looks like the previous 'body guy' just tacked in a patch, then covered it in roofing tar. I don't remember seeing that procedure in any bodyshop manuals...

Unfortunately, my vacation is over, so progress will return to slow and steady again. Hopefully, I'll get some quality time in during the month of November.
22 spot welds drilled out to seperate the firewall from engine bay.
Killer patch job by P.O.'s body guy.