I've spent the last few weeks doing more head scratching and starring than welding and grinding. I need to get the rear end of the ghia back together, but I need it to be correct. I realized last weekend that I needed a second brain involved and I called my wife's Grandpa Cecil to see if he could bail me out again!!! Tuesday night he came over and we started making forward progress again.
For Cecil it all comes easy. Most of the problems that stop me dead in my tracks are just simple things that he's encountered before; either in fabrication or repair. My problem was the gap for the rear decklid. It was pie shaped because the rear quarter was improperly installed by the PO's "bodyman."
It seems simple enough, pull in the top of the opening and push out on the bottom. Unfortunately, every time we did that, the skin flexed up by the door. We welded on a couple scraps of rebar to give us something to clamp to and draw the gap together. Again, too much flex in the forward section of the panel forces the bottom of the opening even further in.
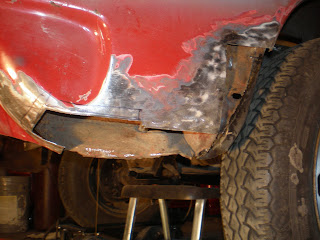
After about 2 hours of fighting, we decided it was time to remove the whole quarter from the B-pillar and find out if there was something else wrong... Yep. MORE CRAPPY REPAIRS!!! The skin was welded onto the B-pillar with about 1/4"-1/2" gap between the mating surfaces. There was bondo and caulking stuffed into the void. There was also a 1"+ buldge in the wheel well that was pushing the front end of the panel out, creating the uneven gap at the back of the car.
I have knocked the wheel well fairly straight again, welded up a bad section in the well, and I still need to work the B-pillar over a bit to remove the gap between it and the door skin. While I had the panel off, I decided to knock off the major rust and hit it with some POR-15. I forgot how much that stuff can stink up the house!

Rebars welded on so the clamps have a place to "grab on"
 Rear Quarter removed (Am I in over my head?)


