Sunday, August 30, 2009

Right fender stripping

I decided no chemicals today. I hit the crusty fender with a 5" sander with a 24 grit pad. When I had a majority of the paint off I switched to a 6" DA with 80 grit. Everything on the fenders cleaned up well. I also cleaned up most of the cowl as well before the pad on my DA came apart. I couldn't get a few areas, so I'll pull out the blaster and clean up the rain drips (on the windshield posts), the channel where the hood seal sits, the wiper bosses and the gas filler area.

While I was at it today, I removed the filler lid and flap release lever from inside the car. I may work a bit on it later today and fill some holes.

I'm not going to make my August 31 deadline for the metal work on the front of the car to be complete, but I am going to be pretty close.

I also ground down the weld on the right headlight... I think I welded that on 7 years ago!!!
Fender after grinding and sanding the paint off

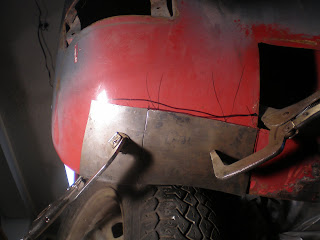
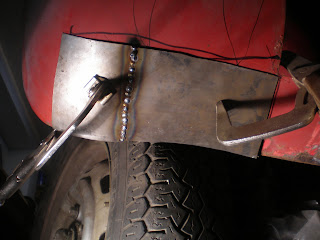
On top of trying to get the Karmann Ghia restored, I am training for my first marathon. With an 18 mile run on the menu today, I didn't know whether or not I would get back to the car tonight... Well a nagging case of runner's knee cut my run short by about 12.5 miles. Since I still had a few hours of good energy left, I got back onto the car for a couple quick patches. I filled an area by the spare tire that I burned through with my 7" grinder. I cut out a little patch and welded it up. I also had a patch to install where the right side air vent came through the inner fender. Please don't laugh at the welding. That was the most difficult to reach place I've had to patch. It was done left handed and half blind. I should have welded it from inside the wheel well rather than the luggage area.

area I burned through with the grinder
Hole remaining from where I removed the fresh air inlet
I welded a tab to the patch so I could hold it in place while I tacked it. Clamps wouldn't fit.
Patch welded (if that's what you want to call it) in

Saturday, August 29, 2009

Stripping The Front Fenders

I decided to try a chemical stripper on the front fenders today. Everything I read said to let the stripper work for you. One guy said put it on and get some lunch, come back and take it off. Another guy said let it sit 4-5 hours or over night. I don't know what brand of stripper they used, but I found out the hard way not to let it sit that long.

I spread on the stripper (Bix) the way I was told: dump it out of the can, brush it LIBERALLY in one direction only. I let it sit for about an hour and a half. I dug up a test bit and saw it was down to the original primer. I let it sit a bit longer and decided I needed to get after it because I had limited time to work before I needed to leave. As I was scraping off the paint, I realized that if the stripper drys up, the paint starts to re-solidify.

I used both a razor in a holder and a putty knife to scrape off the paint. After I got off all I could that was still wet, I hopped in with a razor to clean off the dry stuff. 3 hours later I had a clean fender. I bet I scrapped 9/10 of the paint with the razor... Not the result I was after. I cleaned up the fender with a DA and 80 grit paper. I also started in on the right fender, just scraping off the top crust. WHAT A PAIN!!! I be faster next time.

I got home from dinner and worked for an hour with the razor scrapping paint off the right fender. I will try more stripper tomorrow and see what happens.

Fender before chemicals
Paint bubbling up after about 15 minutes
Scraping off the paint
After a few hours of scraping and 30 minutes with a DA fender is nice and clean
The side that dried. Even with a second coat of stripper, this was all I could scrape off

Thursday, August 20, 2009

More shaping on LF grill filler

I have been stuck for a few years trying to figure out how to make the reverse curve for this filler panel. I thought I had it figured out last night, but after an hour and a half, I gave up. The short direction contour is pretty slight, but the long direction is the same curve (close to it anyway) as the nose section. I kept getting the ends to look good, but the middle 1/3 of the patch was either flat in the short direction or the sheet metal was contoured the wrong way... I went to bed frustrated and decided to think about it later.

When I got up, I looked on YouTubes for a reverse curve video and found a couple that used a special die and a planishing hammer. John Kelly had a method for using a shrinking disk. Well, I don't have all the pieces for either of those setups, but I do have a HF e-wheel. The video with the dies and hammer told me what I needed to know: You have to stretch the edges of the panel in the long direction to get the long curve to appear. John Kelly does just the opposite, he shrinks the center of the panel. Either way, I was stretching the center of the panel and there was no way that would ever work!!!

I set out tonight and curved the patch to meet my template in the short direction. Then I wheeled the bajesus out of the long edges of the panel (see pic below) and started to see the long curve form. After 10 minutes of wheeling, the patch met both curves from my template, so it was time to stop and trim the panel to fit the opening.
patch with reverse curve (as slight as it is.) Notice the panel is curved down on the leading edge, through the center and at the back. This is critical to check all locations.
Patch held in place. It's difficult to see, but it's spot on where it meets the body and the other patch (I feel like I know what I am doing again!)
A few of my post dollies and tubes I use for bending and beating. I get all the metal out of the scrap bin at a place called Metal By The Foot here in KC. Works out perfect, the scrap is cheap and sized just right.
Hard to see, but the short direction curve is pointed down like a frown. The long curve is up like a smile. This was AFTER I trimmed the patch, but this is how I wheeled the edges. I used fairly heavy pressure.

Tuesday, August 18, 2009

RF Inner Fender Air Vent Patch

I had an hour to work tonight so I fit up the patch to seal up the inner fender where it used to house the fresh air box. Nothing special, just some trimming and welding. I will move to the bottom section of the inner fender next, then fill in the hole in the outer skin. I believe I can get the seal in one long piece rather than the stock lengths. I suspect I'll have to put it on after everything is buttoned up so I don't set it a-flame.
view from inside the luggage compartment
View from the exterior

Monday, August 17, 2009

Filling in the Air Vents - Part I

I started work on fabbing the filler pieces for the fresh air vents. I first made a template of the curve of the Karmann Ghia nose on thick cardstock. Then I cut a 7"x16" blank out of my sheet stock. I worked it on the english wheel until the contour of the panel matched the contour of the template. In hind sight I should have cut my blank longer and made both left and right sides at the same time. I then transferred the lines from the hole in the nose to the metal and trimmed it out.

I also fabbed up a patch to fill in the section of the inner fender where it meets the fresh air intake. Hopefully I will have some time tomorrow night to start welding these pieces into the car.

Nose curve template on the Ghia
Template on the sheet metal patch
Patch clamped into place for fitting
Inner fender patch

Saturday, August 15, 2009

Patching Nose and Removing Fresh Air Duct

I spent a few hours today patching up the area on the driver's side where the inner fender meets the nose. Again the PO "fixed" this area by slathering on the bondo. A few minutes at the E-Wheel to get the patch shaped and it was on to cutting, welding and grinding.

When I had that area cleaned up I went under the passenger side fender to remove the fresh air duct like I did on the other side. I was able to cut it all out and I have ground off the bottom flange. I'll need to go back and grind off the top flange tomorrow or sometime next week. It's really hard work to hold an 8" grinder over your head to cut and grind up inside this area. I should really mount this car up to the rotisseree that I built. Oh well... I am almost done with this part.

I have given myself a deadline of the end of summer to complete the metalwork for the car. I figure I will need to have the front end complete by the end of August to be on schedule. As I look forward the list for the front end is getting short. I have the following parts to address:
-finish removing the PS air duct
-fab the PS lower inner fender
-weld on both lower inner fenders
-patch the hole where the fresh air diverter sat
-fab up Rt and Lt bumper mounts
-install the headlight buckets
-fill the fresh air grills
-fill a few pin holes and grind down all the welds.

Rust holes outlined
Patch welded in

fresh air duct before
Rear section of duct removed

Front section of duct removed

Tuesday, August 11, 2009

Nose Patch #1

I have an area on both side of the nose that needs to be patched. It's the area where the inner fender gaskets touch the insides of the nose. I spent about an hour tonight cutting, fitting, welding and grinding the patch on the right side of the nose. Hopefully I'll have an hour or so tomorrow night to get the left side done.Before. The PO spread filler over the area to "fix" this set of holes.
Panel clamped into place with my HF panel clamps
Patch ground down

Monday, August 10, 2009

Right Front Lower Headlight Area - Part 2

My plan to section up the panel below the PS headlight worked like a charm. It actually made me feel like I sort of know what I am doing! I spent about 15 minutes fitting up the second piece of the patch. I welded the two pieces together while they were clamped to the car so I would know if they warped out of the desired shape.

After I stitched them together, I traced the edges and cut out the bad section. About 20 minutes of cutting and fitting and I was ready to weld in the new patch. Once again I used my Harbor Freight panel clamps to hold everything in place. I now think those might be my best $10 purchase in the past decade. 10x better than any vice grip. When I use my big 10" or 12" vice grips, the weight of the clamp often pulls the panel out of place. The HF clamps are small and light and have no limitations where they can sit. I have been scalloping a bit of extra metal out where they sit so the joints are a bit tighter than if there were no scallops. I LOVE those clamps.

I will get this patch and the apron ground down and finished off later in the week.

Two patches clamped in place
Panels welded together
Bad section removed, good section welded in

Sunday, August 9, 2009

Lower Headlight Patch

I worked on a patch for the lower section of the headlight panel on the right side of the car the other day... I didn't get the fit I wanted (I'm not a wheeling expert yet). I remember reading a section of a book on sheet metal fabrication that said if the panel gets too complicated cut it in half and make two simpler pieces... I am much better at welding than wheeling, so it was time to cut this one in half (even though it's pretty small to begin with.) The hem on the back side of the panel made it that much more difficult.

I spent about 15 minutes cutting this down, hammering it and wheeling it to the correct contour, then I drew the line for the hem and hammered it into the panel. The curve at the bottom made the hem somewhat difficult. Later in the week I'll make the part to the left of this one and weld them together.
Too many marks! The thin line is the final mark.

Patch clamped on. The ill fit at the bottom right is the hem sitting on the existing panel face, not bad fabrication!

Saturday, August 8, 2009

Front Apron Goes In

The Ghia received it's new front apron today. I started by marking the center of the panel and the center of the horn opening so everything would line up correctly later in the day. To fit up the new panel, I first cut out the old tire bubble so the new panel could fit tight to the body. Then I marked the top edge with a sharpie. From there I decided that I wanted to trim the new panel's width. I marked on the car where I wanted the new panel to stop. I then cut out the old (leaving about 1/2" where the panel met the lower inner front panel). Where the apron attached to the lower front panel, I ground down the whole strip rather than drill out the spot welds.

After I removed the panel, I took a wire brush to the mating surface of the horn bracket and the lower front panel. I also ground off what the wheel couldn't remove.

Then I used my HF panel clamps and fit everthing up. I had to touch up a few areas, but for the most part everything fit tight. Once everything fit, I spent about 2 hours tacking and welding everything together (4 hours total fitting, cutting, welding). I still have to weld the back edge to the lower front panel, fill pin holes and grind but I am 90% on this panel.

Before
Panel cut out (notice the horn bracket is still in place.)

Panel clamped up for fitting

Panel welded in


Friday, August 7, 2009

Removing Right Front Bumper Mount

I'm hoping to get the front apron cut out and fit tomorrow, so I needed to make a few last minute preps this evening. I spent about an hour cutting out the PS front bumper mount. Notice this time I cut BELOW the wrinkle where the tire sits! That will save me a bit of time when I fab up the new patch panel.

When I removed the little triangle that ties the inner front lower panel to the inner fender I found a small rust hole (you can see it in the second pic below). I ground it out to good metal and welded it shut. Hopefully the apron section will go smooth. I am not planning to use the entire width of the new apron, just enough to catch all the rusty bits. The patch does not have enough material to make the hem folds on either sides of the lower front panel, so I'll leave the original in place there.
bumper mount marked to cut
Mount cut out and small rust hole off to the right is ready for welding

Hole welded up just to the right of the grinder.


Thursday, August 6, 2009

I received my front apron from Mike at HOG this week, so I am prepping to install it (hopefully this weekend. When I was blasting the trunk it was evident that the DS lower corner of the "inner front panel" had given up the ghost. I figured I better repair it with the old apron in place so it would align correctly. I worked in two sessions. About 1/2 an hour to fab up the patch. I got the pleasure of making it twice since I forgot to add the bottom flange the first time... And then I spent about an hour after we got back from diner cutting out the old, welding in the new and grinding everything down. I had a 1/4" error at the left side of the patch, so the welding was heavy in that area.

I am going to check out the PS tomorrow night to see if it needs to be repaired as well. The little triangular horizontal piece is still there, so I can't see what's going on below it until I remove that piece.

Looking through the fresh air grill opening to the lower inner panel
Patch welded in
Welds ground down

Sunday, August 2, 2009

Luggage Compartment Gets Paint

I got started early this morning (7:30) and drug the car outside since the humidity was low and the air was really still. I forgot to remove the fuel filler neck before blasting, so I removed it before the paint went on. It took about 15 minutes to figure out how to remove it and about 30 minutes to get it out and clean up the sand that spilled out of it. For those taking notes, I cut the rubber grommet that sits just below the gas cap. Once I cut it off from below, I was able to push the filler neck about 1" into the luggage compartement of the Ghia and then twist it so the filler neck was horizontal instead of vertical. With that done, it slid right out into the front fender well. I then popped out the gromment from the inner fender wall and was home free.

I blew the dust off and started squirting paint. I used DP-90 epoxy with PPG's thinner so it would act like a sealer. I was able to paint the luggage area, hood and headlight buckets. I need to hit a few spots again (I'm not the world's greatest painter). I'll do that the next time I am painting up parts.
Luggage area blasted and painted
Hood painted. Can you tell where I painted the headlight buckets?
Headlight buckets painted up

Saturday, August 1, 2009

Blasting Hood

I spent two hours blasting the top of the hood today. I changed out nozzles on the blaster for the first time ever and it slowed me down substantially. It took the pattern from about 1" wide to about 1/4" wide. It was like taking the paint off with a pencil eraser. The new tip allowed the compressor to keep up even when the blaster was running wide open.

I reused about 100# of black diamond media from yesterday. I scooped it into buckets at 2:30 a.m. because I was having insomnia. For once my insomnia paid off. About 10 minutes after I put the slag into the buckets and brought it all inside, the skies opened up and it rained for 3-4 hours... I spent about an hour sifting the media and getting all the rocks and metal chunks out. I put a big welding magnet into the funnel so when I poured the media in, the magnet collected all the little metal pieces. I was surprised how well it worked. I had one clog at the very end of my blasting and it was a really small piece of metal.

I've been told black diamond/black beauty can only be used effectively one time. Maybe that was the reason things went so slowly. Who knows. I'll find out next time I am blasting.

Tomorrow I'll shoot DP90 in the luggage compartment, on the hood and hopefully on the new headlight buckets that I have had sitting around for a year in plastic bags.

Hood prior to blast
Hood after blasting and 100# of slag on the ground