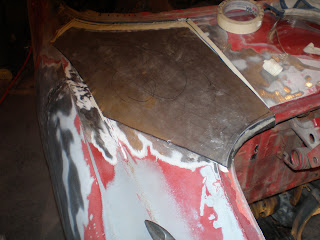
My wife's grandpa Cecil came over to help again on the ghia. Man, it's nice having another set of hands and another brain to bounce ideas off of. Unfortunately, if you double the number of males in a garage working on a car, it usually equates twice the amount of past gas!!! :D
The PO's body butcher hacked 3 panels together to form the area where the rear quarter panel meets the rear apron behind the convertible top. He beat the crap out of the pieces to get them to fit together rather than trimming and butt welding... He definitely subscribed to the theory that body filler can make up for lack of metal working skill. There was a section of the panel where I removed more than 1/2" of filler.
After grinding back to decently smooth metal, I marked out our replacement area, then we set about making a paper template, then a metal panel. We worked the basic curves in by rolling the panel over a 12" long x 4" diameter metal pipe on my work bench. We got about 80% of the shape, and then found we needed to stretch the center of the panel a bit to get the edges to sit flat on the car. About 10 minutes of work on the english wheel and we were really close. We added a bit of twist, then did a very small amount of edge shrinking with my bolt shrinker (see previous post.) After the panel was shaped we added the 90 degree bend where the deck lid opening is. We did it by cutting the curve out of some plywood. Since the panel has curve there, we taped a paint stick to the center of the panel before we clamped it to the curve jig. A few minutes of tapping and it was time to mark the car for the cut.
I had to tape off the area for the cut because I had 4 sets of marks. This actually made the lines easier to see, so I might do that more in the future. About 10-15 minutes of cutting and fitting and our panel fit with about 1/100" gap all around... PERFECT!
Since the panel is removed, I'll be painting the wheel well from the top and also repairing a few welds on the firewall where the factory spots have been seperated. After that, I'll weld in the new patch sometime this weekend.
Subscribe to:
Post Comments (Atom)


No comments:
Post a Comment
Let me know what you think about the project.